Showing posts with label Freebie. Show all posts

Free Snowman Printable Mad Lib

Friday, February 14, 2014

We are trying to break up the monotony of our winter school hours with something a bit different. The kids all worked together to come up with a snowman story. After we all edited it a bit, they went back through and found all the parts of speech they could. (My oldest student and I had to help with the story editing to make sure we could get a good variety of parts of speech.) Then I took the story to the computer and put it together as a Mad Lib. Wooowho! They've had fun and learned things! We hope you enjoy this little Mad Lib game as much as we do!


Next time I will have my older students transfer it to the computer instead of me doing all that work. This has been a fun project! I am not the best at grammar/parts of speech so I hope it is okay. Parts of the story are funny to us because of who added the sentence but I hope it makes sense for everyone else too.
Hahaha!


Free Valentine Copy Work Printable

Friday, January 31, 2014

I put together some copy work sheets for a few of my kiddos so we could break away from the handwriting book for a bit. Sometimes something new can be fun... even if it is the same work. We will tie these in with looking up verses in the Bible and maybe use them as journal prompts too.

There are two different sets of worksheets. One is for K-2 and the other 3-5, but it really depends on your student as to which one you want to use.


2013 - 2014 Free Lesson Planner!

Tuesday, December 03, 2013

I have updated my Lesson Planner... actually it has been updated for quite a long time now. I am just now getting around to putting it HERE for everyone else! Ha! I'm so organized. (rolls eyes)

I love my lesson planner. I have it setup to record 3 students now! It has everything that I need to keep on track for the school year. There are planning sheets, areas to keep various records of progress or where improvement is needed, pages for reading lists, etc. I keep it all in a 3 ring binder. The kids know how to use it too so they can get started on a school day without me, if needed.

At any rate, here's the freebie version of the lesson planner. 
Nice and simple! Love simple!
It does not contain all the great planning sheets the full version does, but it's still a really great tool.


FREE Homeschool Lesson Planner 2013-2014


Overcoming Mommy Madness

Monday, April 15, 2013

image Have you ever heard of it? I am inflicted with it. I have recently found a small amount of relief for it but have also found that it’s still really easy to give into the disease. Mommy madness (to me) is defined as a mom (me) who gets mad either easily or often. When I PMS I am consumed by mommy madness. It is embarrassing and frustrating to me and my entire family. It is not pretty.

I try to make light of my “Mommy Madness” but trust me, it is nothing to make light of. If you have never experienced it before, yeehaw! I am so excited for you and I encourage you to keep it up! If you have experienced the madness of yelling, crying, apologizing and repeating more than you care to admit… well… can I just offer you a hug? A completely non-judgmental hug. We all have our baggage to deal with and I understand that. Let’s support each other and find ways to help each other around that baggage!

I knew I needed to work on things but a major warning bell for me was when my kids were helping me pick out my sessions for the amazing homeschool conference I was able to attend. Several of the sessions they picked while looking over the list had to do with being overwhelmed. What really impressed me though was how lovingly my own children presented it to me. I was brought to tears because they wanted to help me and realizing that they couldn’t/didn’t fully understand how to help me they prompted me to seek help with someone else. Blew my mind. Broke my heart.

MommyMadnessHow did I start? Before the this conference I had already started by openly discussing my feelings with my kids. I was careful on some details of my feelings because it may have involved their father, grandparents, etc and they didn’t need the gory details. A simple, “Mommy is frustrated with someone else but that gives me no right to take it out on you.” Was all they needed to relate. I soon began to hear my kids say these words! They were recognizing that they were angry but it was at a situation and not the person in front of them. Baby steps….

1. I want MY TIME, to do MY THING, to BE ME. Now, don’t get me wrong “me time” has it’s place but not in the selfish manner I was hunting it down. Constantly hunting for my time made me resent my children. If I resent them, than of course their “interruptions” will make me mad. I seem to struggle with this concept a lot or at least once a year. I need to remember this from my Standing Up Straight post.


(Click the image for full size. Adjust printer settings to landscape for printing on one page.)

2. I need to accept who I am and where I am going. Sounds simple enough but I’ve been fighting my purpose a lot lately. I have chosen a purpose of homeschooling my kids and I need to respect that, not fight it. Homeschooling has been moved up in my priority list. I have always had it pretty high on my list but now it’s even more so. Attending this conference made me see how I’ve let other things take over and how school was creeping into the back seat. I even let myself slide into the idea that I could “send my kids to school” and be okay with that. Wow… I heard the statistic that kids in schools spend 14,000 hours away from there families between kindergarten to high school. I don’t want to miss that much time with my kids. Personally, I didn’t like spending that much time behind a desk as a kid either. Don’t some of us get enough time behind a desk as adults?

3. Sleep! Oh my… I need more sleep! I no longer let myself take my laptop upstairs (except on weekends). I can have my phone and/or tablet but no more laptop. This makes me go to bed earlier and I get more sleep. More sleep equals a much more peaceful momma! This works for me.

4. Family devotions! This is another priority I have let slip away and I am picking it up again and running with it. The kids are enjoying devotions and I am learning a lot about them and myself. Silly to me that I did not do this every day before. Very silly.

image5. Turning around being overwhelmed to productive. I attended a session at the GHC conference that was recommended by my kids. They only chose it for the title and at first I thought it would just be basic information that I already knew but it really made a difference! I will write more about it later though with my letter O post in the #atozchallenge. I see the clock and my phone alarm has gone off, I need to get to bed.

I  hope something in this post may have helped you along the way or at least encouraged you in some way!
I don’t have to a mad mommy.


This is Letter M for my #atozchallenge
If you want to see more of the
A to Z Blog Hop Challenge, click here!


Google Reader Alternative

Saturday, March 16, 2013

GoogleRImgAlright! Who's idea was it to break the blog world yet again? First it was Google Friends Connect and now it is Google Reader. They set something up, lure us all in, hook and take it away. That's like fishing with fake bait. Not only do the fish get caught, they don't even get a last meal! Cruel I tell ya... I'm never really concerned about the worm, am I? Poor things.

Anywho! Off topic... Google Reader. Who uses it? Some people hate it... if you are one who hates it, give us the ideas that you use to keep up with your favorite blogs! I'd love to see more options. For those of you who do use it and are getting the rug pulled out from under you, here are some other options:

FeedlyImgFeedly!
This is totally awesome! Feedly will pull all your Google Reader feeds (STARRED items and all) in to their account and keep it even after Reader dumps us. Yay! I have moved over to it already and I have to say it is a pretty cool reader. I think it’s a very clean reader and there are a lot of features to get used to but I like features. The extra bonus is that you can use this reader on computer, tablet or phone!

Twitter
Yes, I know... Twitter is a social media not a RSS feed. But think outside the box a bit. Follow all of your current RSS feed favorites on Twitter and put them in one list all together. Generally those with a blog tweet their posts so you will have a somewhat haphazard feed with fun commentary too. You could use Facebook and Google+ in a similiar way. You would have to create lists and circles there to separate everything out.

Blogger Reading List
For those of us with a Blogger blog (still) we might be able to continue using our feeds from the main page of Blogger. I believe that list will stay there even though Google Reader is exiting the scene. Maybe not? If anyone knows otherwise, please inform me and I will cross this out as an alternative. Blogger Reading List isn't the easiest thing in the world to move through, but it's at least there.

FeeddlerImgFeeddler App
I have a reader on my IPad called Feeddler. I think it’s available in the Android market too. I have not checked yet to see if it will KEEP my feeds after Google Reader dies or if it’s just syncing with Google Reader yet though. It is a nifty little app though… for now…

Disclaimer: I do not own nor was I contacted by any of the sites listed/linked above. This is just my opinion. I am trying to help others with resources.


Free Halloween Printable

Monday, October 29, 2012

I do not like halloween. Do you? It's just not my favorite holiday. When my Hubby and I got married I already knew that he and his family LOVED halloween. It's a major holiday for them! And it's not because it's spooky and scarey and all that. It's just fun for them. When we started planning babies though I started talking to Hubby about halloween and what we would do about it. (To tell you the truth I only remember trick or treating once! I may have gone a few other times, but I don't remember. And the one time I went was my parents driving us to our grandparents. That is it.)

We made a few compromises and I'm happy with the holiday now. It is fun for the kids and they love planning and/or making up their costumes each year. We don't permit anything gruesome, dead or dying. Only animal, plant, mineral, cartoon or real person costumes are permitted. No weapons are allowed. And my final push on the whole, "lets see how much candy we can take from everyone" was to give thank you notes back to the doors we stop at and limiting the amount of houses we stop at.

Each year what do the kids look forward to the most and fight over at each door? Not the candy being handed out. No... the honor of handing back one of our thank you note postcards that they have each decorated. We only give one at each door. Each kid decorates between 5 or 10 cards (depending on age and other factors... one year a few kids were sick so the others picked up the slack of decorating). Everyone who receives our thank you notes back loves them! Some houses that we visit tell us they still have the other card we gave them last year!

So now I would like to share with you our thank you cards for you to make with your kids! Click the image below, print on card stock, cut on the dotted lines and decorate! It's fun to use glitter glues, paint, crayon, marker and more. For us it depends on what we have time to work on. This year, I didn't have time for drying things so no glue and paint. The thank you cards really do add a twist to this holiday. Enjoy!


FREE Homeschool Lesson Planner

Tuesday, September 25, 2012

I love my lesson planner! I have adapted it, added to it and even removed things that I first thought I couldn't live without. I now use my lesson planner on my computer and IPad so that I save on printing and binding! It's perfect for me!!! I had my FREE lesson planner available with signups to my blog newsletter, but there is something seriously wacky going on with feedburner right now. Sooooo... I decided to change all of that. Would you like my Free Lesson Planner without having to signup? Of course you would... who doesn't like free?

I would like to note that the Free Lesson Planner version that I have here is not the full version. I do have the full version with extra pages like four year planning guides, attendance, grade sheet, quarterly log journal pages and so much more! The Table of Contents in the Free Version will show you a listing of all the pages available in the Full Version of the Lesson Planner. If you would like the Full Version of my Lesson Planner, just click here.


I recently updated my Lesson Planner from plan old green and white to pretty with flowers and all sorts of fun colors! I love the new design of it. I recommend that if you are printing and want to save the color in your printer that you change the printing properties to black and white. This lesson planner has space for one student (maybe more) and has dates filled in for Aug 2012-July 2013.

I hope you enjoy this planner and that it fits your homeschool needs!


Skort to Skirt Tutorial

Saturday, August 25, 2012

This was one of my very first little sewing projects I tackled. Learned a TON from it! So glad that I have found sewing. It is really fun! I think the reason I like it so much is because I actually FINISH something. You know that I mean? I am a mom of 4, homeschooling, keeping up with the house, throw in a few critters and a busy Husband. Nothing I do ever gets finished. Except now I can say I finish things a LOT because of sewing. Woowho!

First off, this is a photo HEAVY post. First tutorial… I took pictures of everything and I only used half of them here! Ha! Secondly, all pictures were taken in a hurry with my phone. Some of them don’t look so well. Sorry!

SkortMaterials:
1 too short skort
1 old nightgown, dress
or approx 1yd of 60in fabric

PLUS:
thread
sewing machine
pins
bandaids <- - yes… get them

And the desire to have an adventure with your sewing skills is always a bonus.

Skort1
Now to get to work!
Grab a snack while you contemplate your plan of attack.
Skort2
Wait… no… you have a plan here.
Cut out the inside shorts of those skorts.
Skort3
Be careful of the inside pockets!!!
Oh and my fingers look grotesquely bent in this photo. Weird…
At any rate, cut carefully along the inside pocket with scissors.
Skort4
Now figure out what length you want to cut down your skorts. I wanted the back pockets intact. Originally I thought making the front shorter than the back would be cool, but I couldn’t figure out the logistics of the nightgown so I just went for straight across. Hehe…
Skort6Ta Da! Now you have some really, REALLY short skorts.
I used my handy-dandy-sewing-ruler-thingie (that’s the technical term) for cutting as close to a straight line as I could. You might want to use a fabric marker to make a line though. Might work better.
Skort5
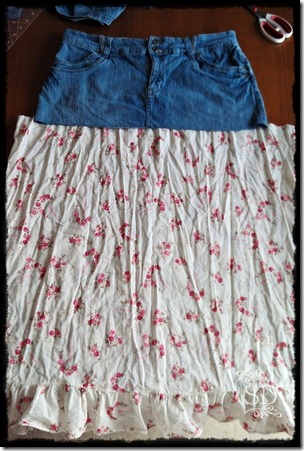
It’s the nightgowns turn on the chopping block. I didn’t want the strip of buttons down the front so I just cut straight across from that point.
Skort7
This next photo shows how much wider the nightgown is from the skorts.
(Ahem... maternity night gown. Thank you.)
Time to pull out the iron and set up your hem! I made my hem about 1/2in because I wanted to make a ruffle. Use pins to hold it after you iron and be sure to have that box of bandaids handy now.
(You think I’m joking don’t you? Get the bandaids!)
Skort8
Now, at this point I had a bleeding finger. (Thank you bandaids for protecting my white patterned fabric!) I wanted a little ruffle where the skort meets the nightgown, so sew your longest regular stitch at the bottom of your oversized hem that you just made.
(If this doesn’t make sense, just keep reading… you’ll see it. I hope!)
Skort9
Not sure how to gather an item?
Check out this pinterest pin for detailed directions.

Here’s three steps in one photo. Are you ready? After you’ve done your gathering stitch pull on the bobbin thread (bottom thread) to gather the skirt together (A). Be sure to check the width of the gathering to the skort (B). And than tie off the gathering thread with a few knots to keep your gathers from skoo-tching (yes, another technical term) around on you while sewing (C).
Skort10
A somewhat tricky part. Remember how I wanted the cute ruffle (from above) peeking over the skort? Well, this idea breaks all logic (for me) of attaching a gathered item to a non-gathered item. So… here goes…

Line up your skort and nightgown hem. Both items should be wrong side out. Put the nightgown under the skort and pin. (In retrospect I think both of the items right side out with the nightgown on top would have made for easier sewing… live and learn. You should try it that way though. You can see the gathering stitch line better and cover it with the attaching stitch.)
Skort11
Here I zipped away attaching them together, sticking myself with more pins and I did an overlap stitch at the bottom of my skort, but forgot a picture. It really isn’t necessary.
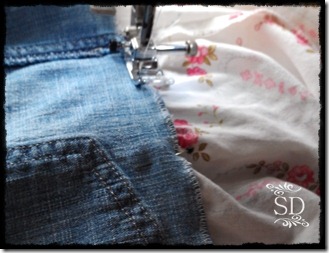
Skort12
Oh and I also attempted to break my machine by letting a pin sneak past me. Don’t let them do that…. grrrrr…
Skort13
And there you have it! (Notice, no bandaids on the fingers? It’s because I took this picture a few days later. Hehe… I did get to finish the project in one day though! Without interruptions I think this should take less than 45 min. Maybe… should… let me know! Hehe…)
Skort14
PS- Yes, I made the upcycled tshirt in the photo too. That was my FIRST ever sewing project. Love it… but never wear it because it says “I Wanna Ride” all over the back of it. Hehehe… Whoops! It’s one of my Hubby’s unwanted motorcycle tshirts.

Linked up to:


Coupon 101 - Plan with Coupons

Monday, June 20, 2011

PlanCoupons

You would imagine that this part of coupon use would be the easiest part of all. You gather up the coupons and go right? Well… it’s better to have a plan! There are a LOT of ways to play your coupons. This is just my little method. I use my Shopping List handout (below) with this slide too.
  • Check out the Ads
    • Ads are the keys to a stores vault! Use them to find the best deals. I have been known to buy a paper in my area just for the ads. The coupons, not so good… but the ads? Vital!
  • Write down what you want most
    • This is SO important! You don’t want to miss a big sale because you forgot about it. Write it down! The better your list, the less likely you are to forget an item in the store.
  • Match Ads to Coupons
    • Here’s where you save time in the store. Don’t take all your coupons with you in unsorted inserts or envelopes hoping you will use them. Take the time before you get to the store to match up your coupons. You will be sure to use them if they are already in hand with your list and ads! And while it might take you an extra hour in the store to do this on the spot it might only be an extra 20min at home to match them up.
  • Calculate
    • A must step for those of you with a budget. If you know what you are getting from the sales, you can have a rough estimate in your head what it will cost. So say you only have $50 to spend. With your list written at home you see that you are spending about $38. NOW when at the store you can see if any extra deals might fit in your budget or not. It’s easier to NOT impulse buy as well… once the item sat in your cart throughout the store you feel like you should have it. If it never makes it in your cart, because you already know the finances aren’t there to get it, you won’t over spend as quickly.
  • Figuring in your ECB/RR and finding hidden deals will be covered later.
Now be sure to print at least one of these lists out so you can have it on hand. You don’t have to use it exactly. I use a notebook now but setup my list in the format on the list. It helps to have a calculated list in the store at checkout too because if there total is WAY different than mine there might have been some missed coupons or a double scanned item.

ShoppingListImg

Here’s the list for your personal use. I recommend printing it in Black and White if you need to save ink! 

Go back to Coupon 101 Main Page


Meal Plan for a Month

Monday, February 07, 2011

Notice: This post was heavily edited AFTER posting it and realizing I could be considered a “copy cat”. So sorry for the confusion!

I have started something new (for me!) and LOVE it! In January I began putting together my meal plans for a MONTH. Not just a week. It’s challenging to get started, but the benefits are real. My husband is more willing to jump in and make meals, my kids will ask in the morning what’ for dinner (which reminds me to set out my meat!) and I am not as worked up with a busy day because I already have a plan for the “witching hours” later. Ya know the time… “I’m hungry!” “What’s for dinner?” “Can I have a snack?” “What do you want for dinner honey?” “I don’t care.” ERGH! Always hated that response to my pleadings with someone else to make a decision! Hehe…


MealPlanPlannerPost
At any rate, I started setting up my meal plan for a month by gathering up all our favorite recipes. My first goal was to just list 15 recipes, but I quickly found that we have a lot more than that! I have a cookbook software to keep all my recipes in (MasterCook), but really prefer to make meals from written recipes. So I compromised! I type in recipes as a I can, print them out and stick them in a binder. This binder also holds my ripped out magazine recipes and printed internet recipes that I want to try too. Of course, having ALL these recipes in one spot makes it much easier to make our meal plan for a month.

So where am I going with this? To what I use to compile all my recipes for the month. I love Excel… it’s really my BFF… Check this out:

MealPlanPlanner
Lists help me feel so accomplished! It’s a basic spreadsheet with a place to write in the day (Mon, Tue, Wed, etc), date (1,2,3…), Main Dish, Side Dishes and a spot to mark down any grocery needs or notes. So simple! I also copy/paste this over to my IPad so it’s mobile with me. Although, I have yet to find a good IPad spreadsheet app. I just put this in my notes.

Would you like to have this for yourself? Well… Here ya go!
Click the image below to get this in a PDF format.


MealPlanPlanner1
What if you want MORE than my simple spreadsheet? Well guess what! After taking all the time to type up this post and thinking, “Wow! This is such an awesome little tool for me to share.” I realized that I am a day late and a dollar short again. Organizing Junkie, being the wonderful organizer that she is, revealed an AWESOME online site (LAST week no less… where was I? I dunno… Fishing?) that you can even use with your mobile phone for meal planning. And it has settings to meal plan for a month. Plus (yes, there’s more!) there’s recipes available to link right into the nifty software app already in place!!! Now… I was totally done patting myself on the back after seeing all that. You definitely should go check it out and give Organizing Junkie a round of applause!

Now here is where I am for now on our menu plan. We missed quite a few meals on our plan last week, which is REALLY weird because we were snowed in? I think it’s because the kids weren’t home that I fell off the bandwagon. Anyway…

Mon – Pancakes
Tue – Tortellini Toss
Wed – Crockpot Lasagna
Thur – Biscuit Topped Chicken and Cheese Casserole
Fri – Mashed Potato Soup
Sat – Leftovers or Kids Cook Night
Sun – Mac n’ Cheese with Sausage and Applesauce

Sunday is a little weird isn’t it? Hehe… It’s a family tradition. At least, it was for my family and now Hubbie is converted. Or influenced? Conned? However it happened, we all like it this way now. Hehe…

Do you plan a monthly meal plan? Do you plan for weekly meals?

Check out MORE great Meal Plan ideas at: I'm an Organizing Junkie.

Take care!


Thanksgiving Lapbook

Tuesday, November 23, 2010

LapbookThanksgivingWe started our first ever lapbook last week! While planning this lapbook I was overwhelmed. I had heard so many praises of them for keeping things organized that I also assumed that they would be simple to plan. Well, maybe now that I have experience it might be easier to plan. Also, researching bits at a time, printing/saving and coming back for assembling later would be better. Plus, I put the lapbook together first and then the kids would complete each section. This is backwards. Hehe… The kids might have more fun sticking everything in the book too. So those were a few errors I would like to repair for next time. I must say, the kids LOVED them!

Needless to say this has been a learning experience for both me and the kids. They enjoy the idea of unfolding or lifting flaps to complete their projects. I enjoy that everything is all in one place for a topic but it doesn’t all have to be completed in one sitting. Also, this is just one of the lapbooks I made. I made one for each kiddo so I made a different one for three grades. My youngest student did not have the page that lifted inside.

So here it is, with links for everything!

LapbookThanksgiving1
LapbookThanksgiving2
Front Cover:
- Pilgrim Kids – pg 8 (This is a “premade” lapbook too! I liked some of it, but some was too advanced for a few kiddos or I had something else in mind before I found this.)

Inside (Left):
- Acorn Maze (Older), Turkey Maze (Older) or Indian-Corn Maze (Younger)
- Crossword or Alphabet Dot-to-Dot

Inside (Right):
- Count your Blessings Pocket (I had to recreate this because the lapbook site it came from is now MIA.)
- Word Search

Middle (First pg):
- First Thanksgiving Flip Book
- Math Worksheet
- Color by Number Turkey

Middle (Inside Flap):
- Vocabulary Pictures and Words Flaps pgs 3-5 and 13 (After working on these, they don’t really work together well. You have to explain more words than there are pictures.)
- Mayflower Survival List pg 2
Classroom Freebies Manic Monday
Back (Forgot a picture!):
- Handprint Turkey Worksheet (Again, I recreated. The original is no longer available.)

You could also pick MORE or different things from this page.

Have fun!


Force Link to Open in New Window

Wednesday, March 31, 2010

I've seen a lot of people asking about this so here's a QUICK tutorial on having a new window open when someone clicks a link on your blog. This is HTML style... hehe...

I use Blogger so when I am typing a post I use the Edit HTML tab and type my HTML right in my post. If you use Blogger, just type up your post however you do it, check your post in the Edit HTML tab and do this for your links:

<a href="http://www.WEBADDRESSHERE.com" target="_blank">LINK TEXT HERE</a>

Basically the target="_blank" is what makes the link open in a new window.

You will have to edit the two highlighted areas to make your link point at and work with what you want it to.
Change WEBADDRESSHERE to the URL permalink (look up in your browsers location bar).
Change the LINK TEXT HERE to the title that you want the link to be called.

Clear as mud? I know that this Works for Me! :)
Ask questions in the comment and I will respond there. :)